Creating a custom system service on Ubuntu is an essential skill for system administrators and developers who want to run scripts, applications, or background processes automatically. Modern Ubuntu versions use systemd—a system and service manager—to handle these services. In this article, we will walk you through the process of creating a custom system service on Ubuntu, explaining every step in detail. We will cover the basics of systemd, how to write a service unit file, and how to enable, start, and manage your new service.
Introduction to systemd and Custom Services
Ubuntu, like many modern Linux distributions, uses systemd as its default init system and service manager. systemd is responsible for booting the system, managing system processes, and handling dependencies between services. By creating a custom service, you can automate tasks that need to run at startup or operate continuously in the background.
Why Create a Custom Service?
- Automation: Automatically start applications or scripts when the system boots.
- Process Management: Easily start, stop, restart, and monitor background processes.
- Consistency: Use systemd’s logging and dependency features to ensure your service behaves predictably.
- Resource Control: Leverage systemd’s resource management features to control CPU and memory usage.
Understanding systemd and how to configure services can significantly improve your control over system processes and overall system reliability.
Understanding the Anatomy of a systemd Service Unit File
A systemd service is defined by a unit file, which is a plain text file describing how and when a service should run. For system-wide services, these files usually reside in the /etc/systemd/system directory.
A typical systemd service unit file is divided into three main sections:
The [Unit] Section
This section provides metadata and dependencies for the service.
- Description: A brief description of the service.
- After/Before: Define ordering dependencies with other services or targets.
- Requires/Wants: Specify dependencies to ensure required services are running.
Example:
[Unit]
Description=My Custom Service
After=network.target
The [Service] Section
This is the core section where you define how the service runs.
- Type: Defines the process behavior. Common types include:
- simple: The service starts immediately.
- forking: The service forks a child process and the parent exits.
- ExecStart: The command to start the service.
- ExecStop: (Optional) The command to stop the service.
- Restart: Determines when systemd should attempt to restart the service (e.g., on failure).
- User/Group: The user and group under which the service runs, which is important for security.
Example:
[Service]
Type=simple
ExecStart=/usr/bin/python3 /home/user/my_script.py
Restart=on-failure
User=myuser
Group=myuser
The [Install] Section
This section contains installation information for systemd, indicating when the service should be started.
- WantedBy: Typically set to multi-user.target for system services, meaning the service should be started during the normal multi-user run level.
Example:
[Install]
WantedBy=multi-user.target
Step-by-Step Guide to Creating a Custom Service
Step 1: Write Your Service Script or Application
Before you create the service file, ensure your application or script is working correctly when executed manually. For instance, you might have a Python script located at /home/user/my_script.py that you want to run as a service.
Step 2: Create the Service Unit File
1 . Open a Terminal:
Access your Ubuntu system’s terminal.
2 . Create a New File:
Use your favorite text editor to create a new service unit file in /etc/systemd/system. For example, to create my_custom_service.service:
sudo nano /etc/systemd/system/my_custom_service.service3. Define the Unit File:
In the file, input the following content, adapting paths and options to your needs:
[Unit]
Description=My Custom Service
After=network.target

[Service]
Type=simple
ExecStart=/usr/bin/python3 /home/user/my_script.py
Restart=on-failure
User=myuser
Group=myuser

[Install]
WantedBy=multi-user.target
Save the file and exit the editor (if using nano, press Ctrl+O to save and Ctrl+X to exit).
Step 3: Reload systemd Configuration
Once the unit file is created, reload the systemd daemon so that it recognizes the new service:
sudo systemctl daemon-reloadStep 4: Enable the Service
Enabling the service ensures that it starts automatically during system boot. Run the following command:
sudo systemctl enable my_custom_service.serviceStep 5: Start the Service
Now, manually start your new service using:
sudo systemctl start my_custom_service.serviceVerify that your service is running correctly:
sudo systemctl status my_custom_service.serviceThe status command displays whether the service is active, along with recent logs to help diagnose any issues.
Managing Your Custom Service
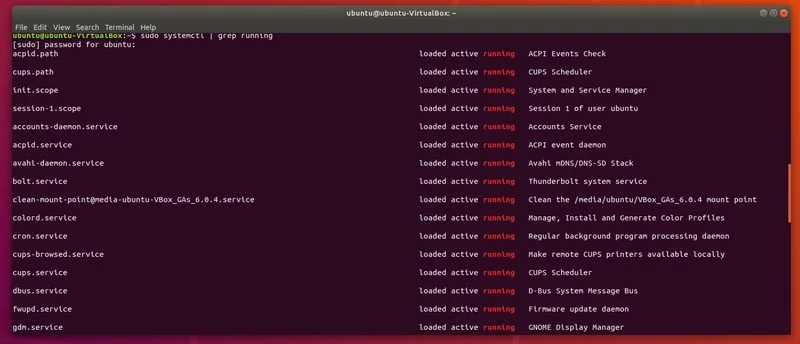
Once your custom service is set up, you can manage it using several systemd commands:
Checking the Service Status
To see the current status of your service, use:
sudo systemctl status my_custom_service.serviceThis command will show whether the service is active or inactive, the process ID (PID) of the service, and recent log messages.
Restarting the Service
After making changes to your script or configuration, restart the service with:
sudo systemctl restart my_custom_service.serviceStopping the Service
To manually stop the service, use:
sudo systemctl stop my_custom_service.serviceDisabling the Service
If you decide that you no longer want the service to start at boot, disable it with:
sudo systemctl disable my_custom_service.serviceViewing Service Logs
systemd uses journalctl to view logs. To see logs related to your service, run:
sudo journalctl -u my_custom_service.serviceThis command provides detailed logs that can help with debugging if the service fails to start or behaves unexpectedly.
Troubleshooting and Best Practices
Creating and managing a custom system service may sometimes lead to unexpected challenges. Below are some troubleshooting tips and best practices.
Common Issues
- Service Fails to Start:
- Check Logs: Use
sudo journalctl -u my_custom_service.serviceto view detailed logs. - Permissions: Ensure the script and its dependencies have the correct permissions.
- User/Group: Verify that the specified user in the unit file has the necessary permissions to execute the script.
- Check Logs: Use
- Service Starts But Immediately Exits:
- Type Parameter: If your service forks or needs to run in the background, consider changing the
Typein the unit file toforking. - Script Behavior: Ensure the script or application does not terminate immediately unless that is the desired behavior.
- Type Parameter: If your service forks or needs to run in the background, consider changing the
- Changes Not Reflected:
- Reload systemd: Always run
sudo systemctl daemon-reloadafter modifying the service file. - Restart the Service: Use
sudo systemctl restart my_custom_service.serviceto apply the changes.
- Reload systemd: Always run
Best Practices
- Document Your Service:
Comment your unit file to explain what each setting does. This documentation is helpful for future reference or other administrators. - Use Absolute Paths:
Always use absolute paths for executables and scripts in your unit file to avoid issues related to the PATH environment variable. - Set Environment Variables:
If your script depends on certain environment variables, set them using theEnvironmentorEnvironmentFileoptions in the[Service]section. For example:Environment="VAR_NAME=value"EnvironmentFile=/path/to/envfile - Security Considerations:
Run your service with the least privileges necessary. Avoid running services as the root user unless absolutely required. - Logging and Monitoring:
Consider redirecting logs to files or using systemd’s built-in logging capabilities for easier troubleshooting and monitoring. - Resource Limits:
Use systemd directives such asLimitNOFILEto control system resources and ensure that your service does not consume too many file descriptors or memory.
Conclusion
Creating a custom system service on Ubuntu with systemd is a powerful way to automate and manage tasks on your system. By writing a unit file, reloading the systemd configuration, and using systemctl commands to enable, start, and monitor your service, you can ensure that your applications run reliably and are properly integrated into the system’s startup sequence.
This guide explored the basics of systemd and detailed how its unit files are structured into the [Unit], [Service], and [Install] sections. We provided a step-by-step walkthrough to create a custom service—from writing your script to managing it with systemctl commands. Additionally, troubleshooting tips and best practices were discussed to help ensure your service operates securely and efficiently.
Mastering the creation and management of custom system services not only helps automate routine tasks but also enhances system reliability and security. Whether you’re deploying a simple background script or a complex multi-process application, understanding systemd’s framework gives you greater control over your Ubuntu system.
By following this guide and applying the best practices discussed, you are well on your way to leveraging systemd’s robust capabilities. This knowledge can lead to more resilient system setups and smoother operations—an invaluable asset for any system administrator or developer working in a Linux environment.